fbpx

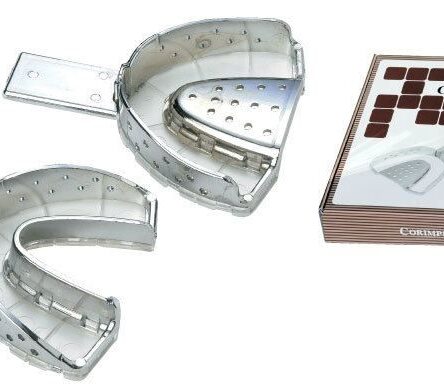
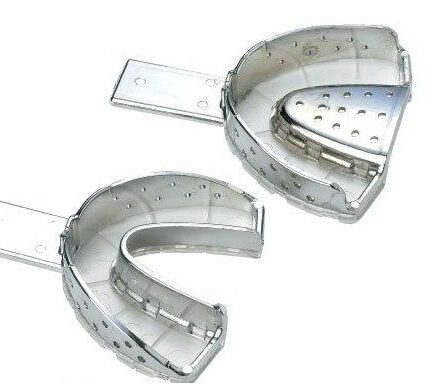
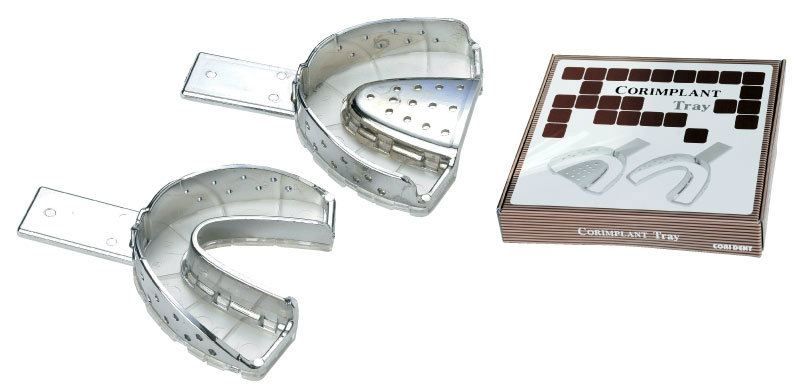
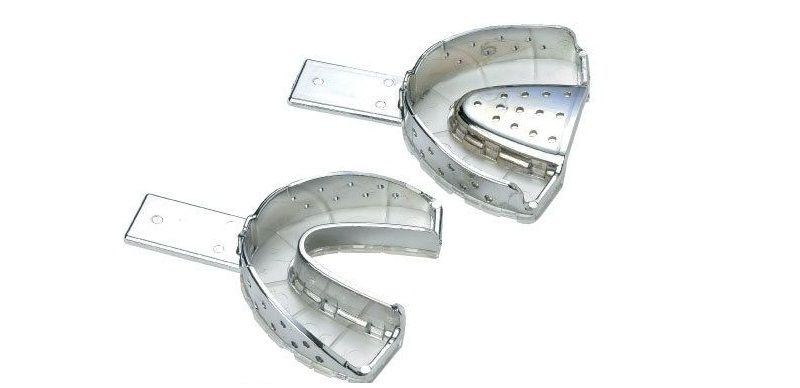
Corident Corimplant Trays

Original price was: $ 178.75.Current price is: $ 119.93.

4 sold in last 12 hours
Hurry! Over 13 people have this in their carts
Brand: Corident

There is no risk of change (Solid aluminum BODY). It is possible to separate the Tray bottom by parts and make a hole exactly on the screw zone since screw zone can be check during getting the impression. Convenience to use. Safety. Fit strong and secure. High Precision.

QuantityPrice
2 - 5 $ 118.73
6 - 10 $ 117.53
11 - 20 $ 115.13
21 - 50 $ 113.93
51 + $ 111.53
Bulk Inquiry
  ... people are viewing this right now

  Share
Guaranteed & Safe Checkout by

Features

  • There is no risk of change (Solid aluminum BODY).
  • It is possible to separate the Tray bottom by parts and make a hole exactly on the screw zone since screw zone can be check during getting the impression.
  • Convenience to use.
  • Safety.
  • Fit strong and secure.
  • High Precision.

Description

CORIMPLANT TRAY is fine quality aluminum impression trays specially designed to make impressionsstronger and secure.

Aluminum is light in weight thus making it easier for Implantologists.

It is harmless to humans since made of aluminum and possible to disinfect in the high temperature.

COMPOSITION :

  • Made up ofbiocompatiblealuminum.

ADVANTAGES :

  • Convenience to use.
  • Safety.
  • Fitstrong and secure.
  • High Precision.
  • It can prevent secondaryinfection thanks to auto-crave disinfection.
  • It can reduce chair time for patients.
  • More economical than individual tray and disposable tray.
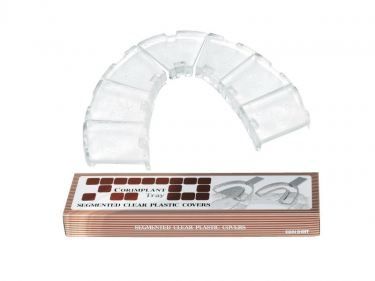
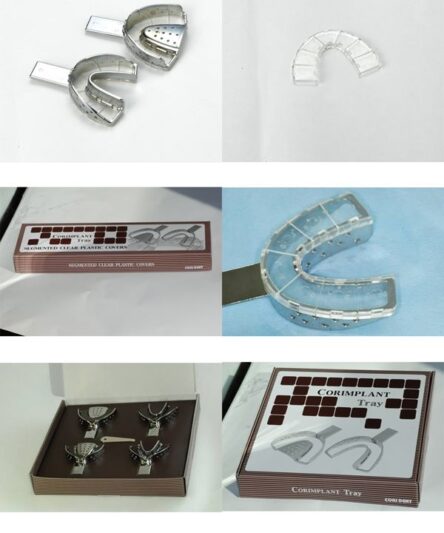
  • Corimplant Tray bottom is made of transparent plastic material that is disposable and changed.
  • Convenient to get the impression without making individual tray since the plastic part can be detached from the implant screw.
  • It is possible to separate the Tray bottom by parts and make a hole exactly on the screw zone since the screw zone can be check during getting the impression.
  • No risk of change (Solid aluminum BODY).
  • Key Specifications

    • Disposable Plastic Covers– Transparent plastic covers for the bottom parts composed of 7 pieces can be separated from metal tray.It is convenient to get the impression without making individual try since the plastic part can be detached from the implant screw.
    • Economic– CORIMPLANT TRAY is more economical than other individual and disposable trays.
    • Packaging

      1 Complete Set of Implant Trays:

      • 2 Medium (U/L)
      • 2 Large (U/L)

      1 Complete Set of Segmented Clear Plastic Covers (210 units):

      • 105 Units x Medium (M1-M7) x 15 sets each
      • 105 Units x Large (L1-L7) x15 sets each
      • Direction of use

        7 Pieces of Plastic covers are used for a tray.

        STEP 1:Before Impression condition of Implant patient

        4

        STEP 2:With screws in the mouth beforeImplant Impression

        qCSiQ8Zvk2ZaZD6bMvZUzqlw WKLFRkXRhO1yyzTK phbXZQHKwj 6B2xZ9mb pKbZ6KMkmk

        STEP 3:Insert transparent cover on the tray. Insert the cover avoiding the part to get the impression

        STEP 4:Try to put on the tray in the mouth. Check the location of tray cover part and screw part and check if the screw protrudes out.

        58qpRta9yApTMA2BpCtXU6W99JT0dfjEnWiyofgQ1DcL2rwZrOp4y2Te TL5LoZl lLM4XC jCQ611JHBzKgjytxsnbiAVf21zWus9vysamyM5aBRKaMebL BuWZoQLJ Js7NbBkIvQ5VnFQw 9Of3OC1XzHlGwsDwI

        STEP 5:It is ok to detach the Screw part Cover and make a hole on the screw zone

        38yB7xSgkoDHysgzLq3zw188AYscfYuQ2cp7Ozjg7QKMIQISmCxyio Ax4 C2x0owZADzy4W7Zb7VpVCUskAWVXOTPZqXvIxoAHJ4kRUOl4nKqL IYDPwiFzsChNp992no2q8iG 8hhrCZY0Eg

        STEP 6:Get the impression of Putty Type.

        9F zu46 n QDhsRoJqLLnoQMwkDOp7nHiaSz T4eDCaVPQoEKo3HL7mzIy SnrA4SSjMYfgWJfWOOvBHySdTnK QQLpeFou2e3KCsD8caU4CucdKP4iL7IMMpT7CvDeY7zatyMd6UUC0confNwzRXwXMyXqBKSu7rTIn3zXoTTQUkQNx TNSzGehNRQT37zsBgDq6O6MF8raEjsdHzPneIifxsaEYYrbYEBWgs1Si888eysSWO2JySxV2tFa PK1gYkQ1NAOiYjjIikFvTj6 2SNbLjuXo0wxF9 8 DHAVmPVtu5bNR4LSH2oslUA4Uiz3S36710aKIxo2cWfD7rVMrdZPEWbO8jp9O6kh n5 9za2e2Ia2hPIBjI3a8 iCswdl8yWYL4L8lg2SUpKAXrWg

        STEP 7: Insert the cover from the inner side of the tray

        PtCaZsep4Elg9MJvf4t12 22MUOw5oP1qH0KHcPryRj9pZMtl gSnzTdq3jp33W8NGh0hANLTloEeMxhEFZ AW3XFKIx1et

        STEP 8:Widen the gap between the cover using a detaching tool and detach the cover. It is easier to detach the cover if you close up the try slightly with your hand.

        FJvrtD pGHFSAmNnTI5KnWRzKij0yPpbv1FEruF4jg8TA2g4vSDDk8TttyrFybd7iSe6Vc4lq31elZaeRE2pQpueaAkvXmie 9rT4HhA1GqjfRwOYCP8B83pcNFYfTNwgM CHDfTain vEmHbg

        STEP 9:Put the Putty Type impression material in the tray

        aL IKm GXOvEhIJNm6VqdEJ08CpQmn 6gs0BMNs4GVhLe3eZcXITtVJvruE7sxzbrDp5rPIhin1BytOVz EyYsVBiYayLX RpVi 1WYooVWwedundLk04dB1shlHRsHpp2c0gXzdfoXl6suUcQ

        STEP 10:Cover the Putty with plastic wrap

        CdeszB kMKl1fu1Kg38xygIjt64F WV FIH9I7ooIqY bPvN6ahPtE3wXJPmCTN

        STEP 11:Get the impression of Putty and let the screw part be protruded.

        9rRrEnQdNcuvP faOUNNvTZWdz85GWM D9cSTlpyqtDagJ3VwWm0 r6ROLxe1rLDmg1vv2BxbQ2IuuWEX7wgbJyupSk0EriXrfmZ4VCh 2sI3B1yVFlL7 jl1ReRGU5woqp 16IOq9qOgr MowXbw0ebhogHau9v76Rc75EpVwRp5 cPJA0tFicZlRjp0CkKGwygCz1Vtr5bg9P9CHOr 2LXiExLjf4wG7mBABPsyWnZky5XKadCs5I864p4iZjLH4 ItZUWg2wWz0yBjyNbS7K6VlHPkwrB5Gqw

        STEP 12:Mix the Injection Type and put it on the Putty impression.

        izNBgP2Z5GQCOGHPKfJUvS1cxPaUjO3 o4LMtkQSTrIena06ZpTek pwlYG5 zpWzhQqNAgb55GzJRr99RoKO0w fIz IIgs186hrWZ33NwKQ7ikKBDLklr6I06sYaiYFJN3AVXJm9BmnN3tQ

        STEP 13:Spread the mixed Injection Type on the part to get the impression in the mouth.

        xF5yuQdsn1FZO

        STEP 14:

        Get the impression of inside the mouth. Get the impression fixing the screw part is exactly outside.

        IoUSKotoNMiOYagDn7ESu4p944 F9dRE p6Yxe6HCdXF80CqGW2WdrkN 2i4Ls5DP 3cpsG6RC BCtcIUeMM5UVgRoKReqDwbfhH77MUoPJ5jPNIBa8ZJpFl EHHqk umqzwlWFLcNv8c EDPvaLeiU7YUt9HNTfXsvVK2XN xQs tYEsEIvKuHSoUVI4UPdtoybOcjC3ArdZnwRTMjMnchQPW8gr3YvKcMvkO5gaCrYrtzSfqdYbucgwWTq3lYgXqEQ9mH44Jyudx 00YWihw

        STEP 15:Unscrew after the impression material becomes hard.

        ng10EFOeHflkTZ4D1CxrXpHxFDJ5bS5uxdXyWAekRYkFlKM42ASYKAeGODlcOmNPkHqRigyl5 AWayHpcw PCxICCm3tpLgGPys0clmRq2DWXtTU9VHHHsE w01A9KJaNMGywQZ Z5EGaC5mVQVEwu1hO1rA5l1CTVP9PUdr4xhJE F1wMvGHgwpTweTD5BY53X1jcO W g0HvLSHlIb6rnKRtRJri02TkowTDQ P72d2HYSIOSaP5oFjnjH35KTIkCYuLF 5IetQQQqhRMB 0OjdKVMGepbk CQ

        STEP 16:Remove the tray out of the mouth with care.

        ilq9GaQcbRsJwww VHDQKhP2NAvN3JkKJgEgv5gIZDzFMMjBITul8z ekd2Sm0catRTnUi Pq14mVbbjAIbisdSnwHdNZs 5ARwWbjdq 0C8jIndVTfpTdGfqPpIoEyMXlP4airh07S jdfKkQ

        STEP 17:Bottom side of the removed tray.

        V 3ryv5tndTP2kN N Gy013mWlJQiDBwfTMRFbkCayALwE3Ac3EOkJg1GR8ZCW7QkHN BhmDnl3S5 AAcAYTKWHvq4pdCiMT84o36xvHYG0YEmZU

        STEP 18:Insert the Lab Analog in the Impression and fasten the screw

        Twwdmn6oB4J0S0mdtGF87n1S1F vE1GeM813PeXf9rTJuqao6YoDuczG2sL3uwY3GCDyeiw lFwv iSOz27Uivkdt9Un HovlgW7oML1xPOL bfTik

        STEP 19:Pour the gypsum on the Tray.

        bF3XGEeofSuNesG t4PysioZdu1g7YF5JYz0 lDX1TGP8m kyLAGWmay8WK TrvzSS3ZL5NjDUvdvs9K52EGXxQNK2qr3TSvBlNCQwN Ta3hrLfU5pccUjETLNDtrodMM13wFCyr8vbBQ0hn5w

        STEP 20:Pour the gypsum to cover the Lab Analog enough as bulging.

        1zheGFJwBBkv8DA4iemqKI2SHzv2fbR4bte Ji7dtGomQGBffsir sTLK3Fu7NHqm6tE0Nx6BSFOo7HWAtghjcQVPkGSeE9J0dwbhwU8oITjZC9IP1ilLeW8GlWiTu5PWCqUo8upAMG5iiKQXBwCFTO0q5ssNXGy71pA RrVZd4bQ5CAujQ xnMcoP f58tnPmkw

        STEP 21:Unscrew and detach the gypsum model after the gypsum is hardened.

        k7sd3QWYn5Dnan8NCJF08BFQxVTwRnzeg6Ax1E6ICVdLOgAcn8ninKqySJHhGyU0t C38i

        STEP 22:Completed Impression model

        sd6aSG1DXh4e X6biKbB2z4tx9CgdLyjNZsZ2rlaMHp7oJuDUruxbGjmsjWQPVrxDhD0Qdh3ipC2yS1FpumWogWarbRKSHN xN5bRwhTnN6iszZErNrs5 WzXPF5 3jLQ5TXyjXf wULMRU5vw

        Impression is taken

        qySJHhGyU0t C38i4dSsSSVBdbuohUM4Cu8Pn JGYT6ZwPyxjWGo9OMC8znKRH TX6X2XqMZRUiuK52LNrmZLr9E1Vh1NZ3d7gXsS5RPZKX jkcBFr7RvlXz4O1Voo7ABc1GCbtesHa7kLJz0fppeKII j0HjZ uBA

        Warranty

        • This product does not carry any manufacturer/importer warranty

      1. We offer Worldwide Shipping by Courier via Air or Sea mode.
      2. Product will be dispatched within 5-7 working days.
      3. Delivery will take a maximum of 7-15 days, based on the shipping option you choose.
      4. Kindly check customs restrictions and rules in your country for specific products, mostly 99% shipments are cleared and delivered smoothly.
      5. For Bulk inquiries or customized manufacturing please contact us.

      Product Enquiry

Categories
My Cart
Wishlist
Recently Viewed
Categories
Click to Chat!
Scan the code
GEE - I have a question about Corident Corimplant Trays - https://gloriaexports.com/product/corident-corimplant-trays/